DLPRO Menu Settings
Video Tutorial
Create a Menu
- Go to Appearance > Menus > create a new menu.
- Name it, click Create Menu.
- Add items from Pages/Posts/Custom Links/Categories, click Add to Menu.
- Arrange the order; create dropdowns using drag & drop.
Menu Locations
- Primary: main header menu.
- Secondary: footer menu.
Set in Appearance > Menus > Manage Locations, choose a menu for each location, then Save Changes.
Additional Menu Item Options
Note: Simple mega menu (column menu) is supported. How to configure:
- Enable CSS Classes first by clicking Screen Options at the top right. The settings panel will appear; see the image below:

- Check the CSS Classes option. Then edit the Parent Menu (main menu). See the video above.
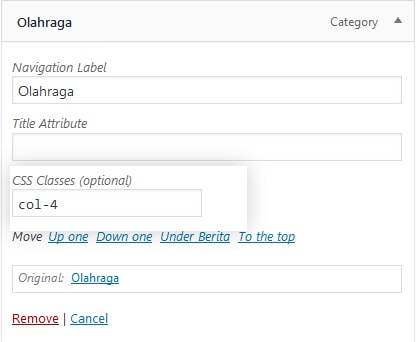
- In CSS Classes, enter:
- col-2 for 2‑column submenus
- col-3 for 3‑column submenus
- col-4 for 4‑column submenus
- Done.
Note: The DLPRO theme supports up to 2 menu locations; see the video tutorial above.
Solution to add icons to menus: Add Icons to Menu
Notes
- Keep menu structure simple and easy to understand.
- For mobile, use the dedicated mobile menu to maintain good navigation.
- Use the footer menu for policy links, contact, or other important information.